

A process wallkthrough of my astronaut illustration!

Hello! I want to share a personal illustration I competed recently, and also share the steps I personally take in creating an illustration like this. Instead of showing a million little steps, I broke it down into 5 images that really chronicle the most important steps in the process.
I hope you enjoy both my illustration and the walkthrough, and I'll be very happy to hear if it helped inspire you in your future projects!
If you want to see more, please check out my Tumblr page or follow me on Behance. Enjoy!
I hope you enjoy both my illustration and the walkthrough, and I'll be very happy to hear if it helped inspire you in your future projects!
If you want to see more, please check out my Tumblr page or follow me on Behance. Enjoy!


This is a different workflow than what I usually do, being that I didn't know what I was going to draw before hand. I often have a basic idea written down that lays out what needs to be drawn, but with this illustration I really just jumped into an empty canvas.
The idea here is to simply find inspiration through colors. This is a technique often used by concept artists, who try and pull forms from a mess of overlayed photos. This can sometimes be an interesting way to approach an open ended project, but it's important that you set things up so that your imagination can easily fill in the blanks.
Many of these photographs are pullled from the internet. Concerning copyright - you are not actually using any of these photographs in the final piece. There will be no features of the photographs remnant in the final drawing, since their sole purpose is to provide inspiration to build off of.
After laying down several different ideas, I thought this combination of menecing reds and the softer, cooler colors looked really nice. The quick collage reminded me of a martian landscape, so I had decided on a setting!
_____________________________________________________________________________________
2.

After deciding on a color scheme and mood to work off of, I started sketching and blocking in forms inspired by the quick photo collage. Given the martian feel of the colors, I felt it be great to plop an astronaut into the image from a lowered perspective that is looking up. Again - the perspective is influenced by the vertical forms in the photo collage.
Why an astronaut playing a guitar? I find a great way to make an appealing image is to take an age-old approach of adding an unrealistic element to an otherwise realistic scene. The suits design is based on images of actual astronauts and plopped into what resembles a Mars landscape - two things that 'fit'. Adding something a bit more surreal and nonsensicle is a great way to bridge the gap between seriousness and playful, and I'll personally take playful over serious any day!
Why an astronaut playing a guitar? I find a great way to make an appealing image is to take an age-old approach of adding an unrealistic element to an otherwise realistic scene. The suits design is based on images of actual astronauts and plopped into what resembles a Mars landscape - two things that 'fit'. Adding something a bit more surreal and nonsensicle is a great way to bridge the gap between seriousness and playful, and I'll personally take playful over serious any day!
_____________________________________________________________________________________
3.
Now that the idea is down, it's time to that rendering out the cene a bit. Working off the forms layed down in the previous image, details are added to help describe the elements of the image. Colors are color-picked from the image and stay fairly monochrome. The big idea here is to render out things with proper values in order to get things to look like they should. In the following step I add linework, but I find it very important to get things to work well with only values without the need of lines to make distinctions between the forms.
_____________________________________________________________________________________
4.
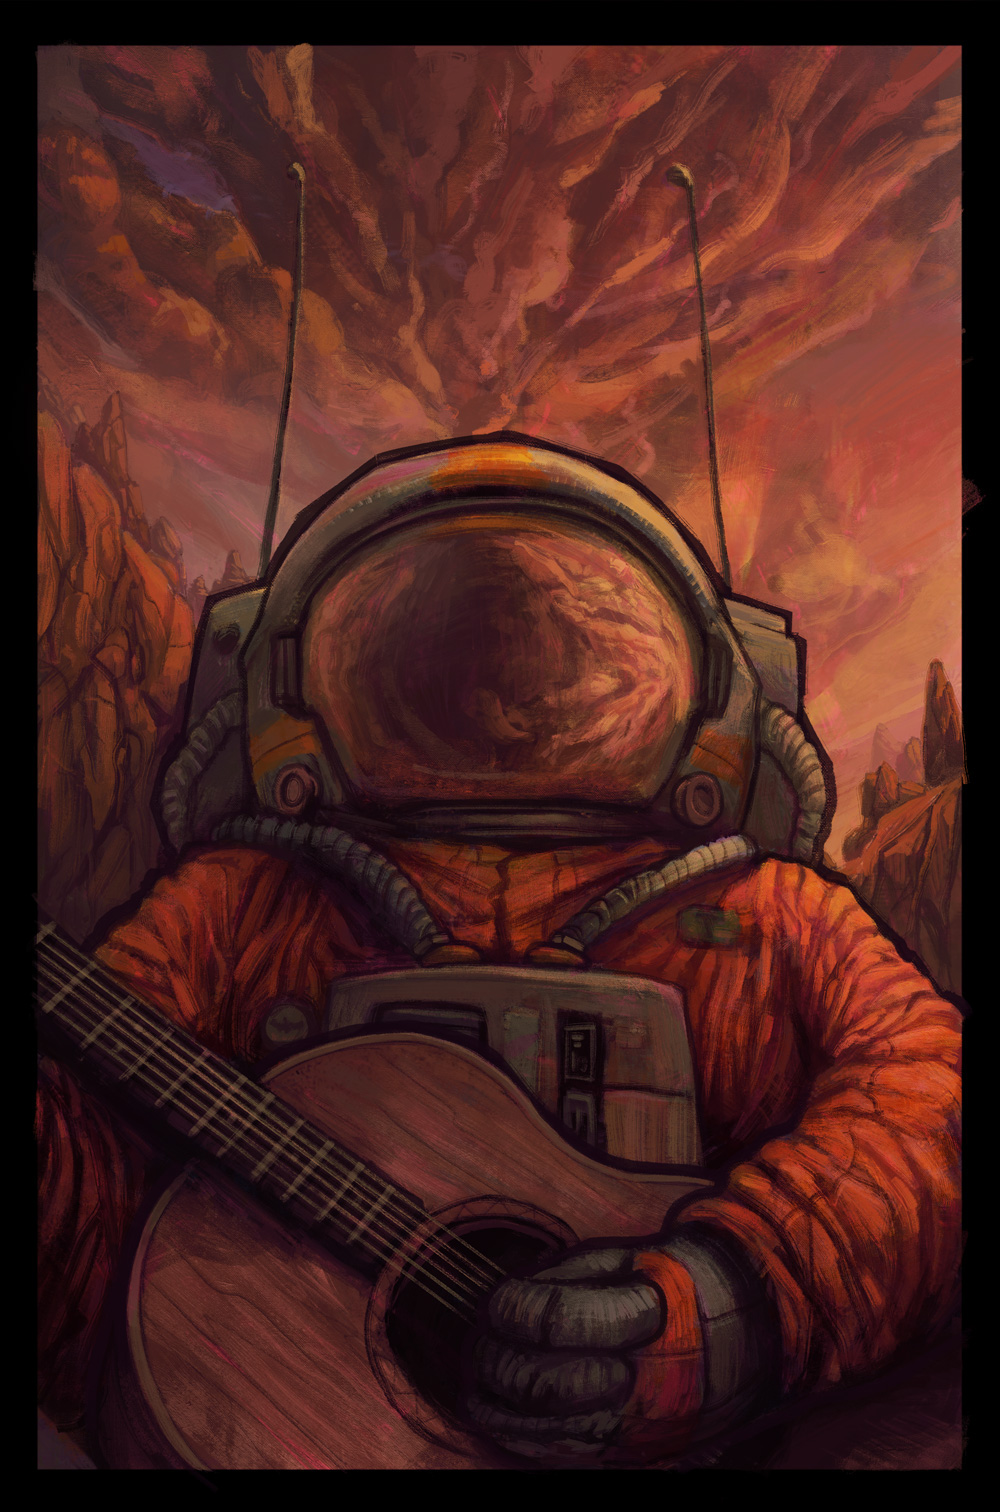
I continue to render the character and add a few rocks into the background to furthur push the alien, rocky landscape. Gutiar strings are added on their own folder of manipulated layers, since trying to draw them into the rest of the drawing is a bit of a meticulous waste of time.
The dark, heavy lines is a purely stylistic choice. I like to use them to furthur reinforce the focus of the image. I like to use lines to give a sense of priority - that some things in an image are more important than others. In this case, the figure is the focus of the illustration, so I gave the astronaut linework while the background recieved none.
Besides the rendering and linework, I played with some of the saturation of the astronaut to help furthur distinguish it from the background.
Besides the rendering and linework, I played with some of the saturation of the astronaut to help furthur distinguish it from the background.
_____________________________________________________________________________________

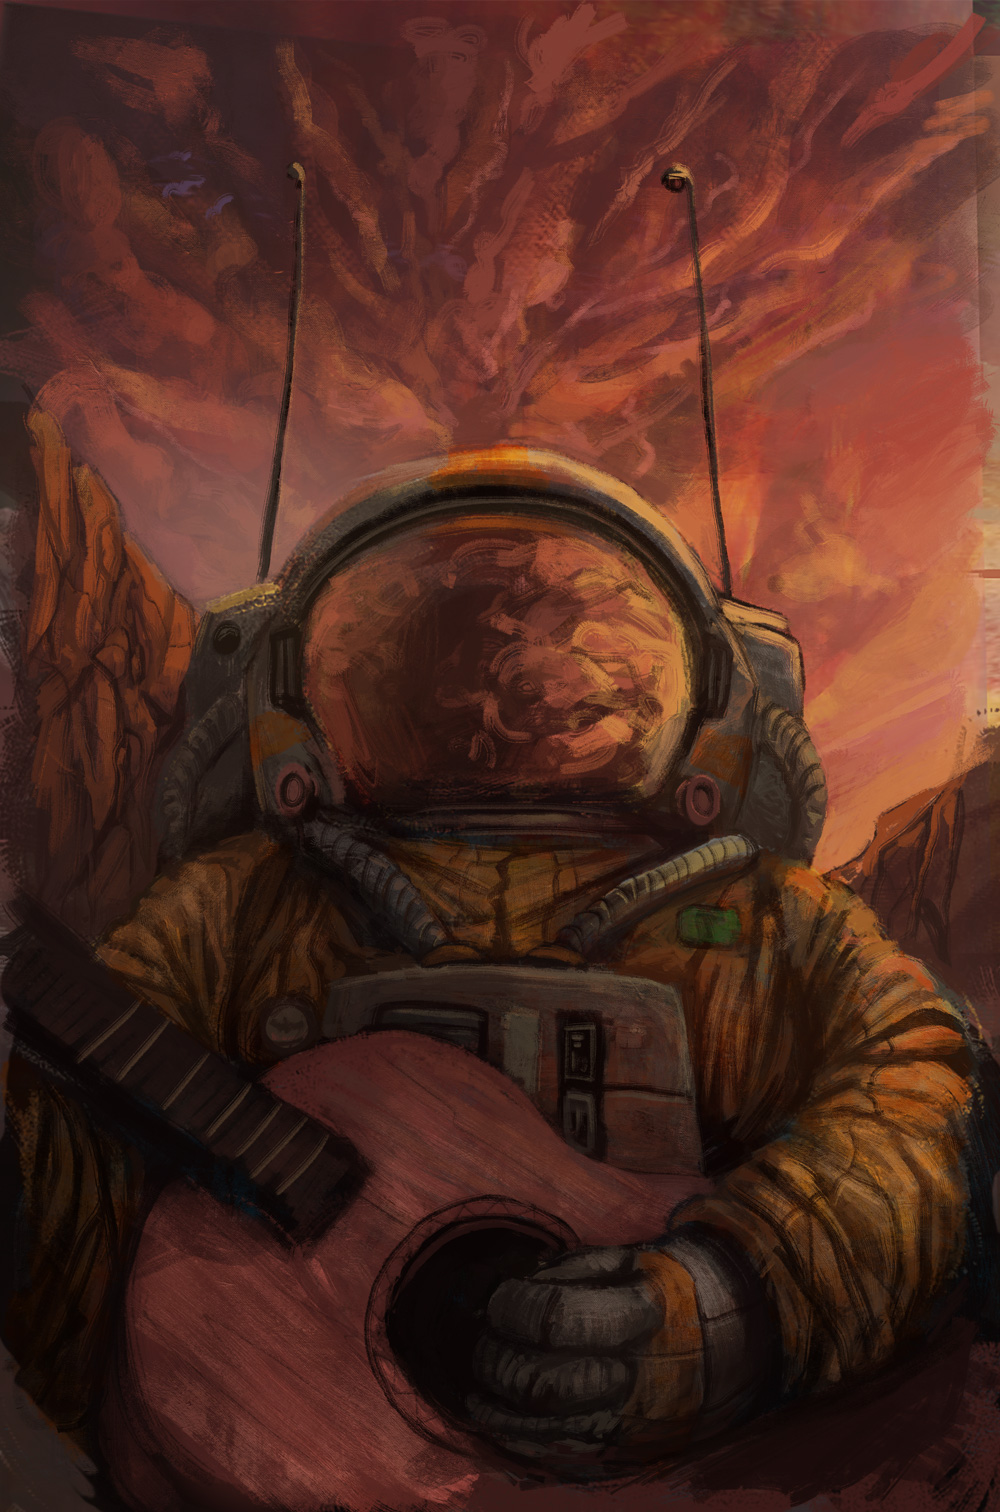
At this stage, most of the rendering is done aside from a few added details. You can render for ever, and deciding when to stop is a matter of stylistic choice. Some artists like the render things out very realistically, while others like to get enough information down so that you simply know what the object is.
My main goal in the final sessions of an illustration is to tweak the colors and values to get them to look the way I want. I like to do these tweaks a few days after I'm done with a drawing, so I can return to it with a completely fresh perspective.
I felt the illustration was suffering from being a little too muddy, so I decided to add some vibrancy. I used several layers set to Soft Light and Overlay to go in and play with the colors & contrast of the astronaut. Most notably, I made the astronaut's suit a brighter orange and made the helmet more white. I did this because - again - I felt too much of the illustration was blending together, and I thought some colors and values that really 'pop' would help this illustration really come to life!

I hope you got some sort of value you out of this, and it is a pleasure to share how I make my illustrations.
If you enjoyed this process walkthrough, please follow me on Behance! You can check out even more illustrations at my artsy dumping ground on my Tumblr!
If you enjoyed this process walkthrough, please follow me on Behance! You can check out even more illustrations at my artsy dumping ground on my Tumblr!
Thanks again for reading!
Ronan Lynam
www.ronanlynam.com
http://ronanlynam.tumblr.com


